There are many resources out there about how to grow your email list. What may surprise you is that nobody is giving a real exact plan to work on; especially if you’re an absolute newbie. In this article today, My mission is to show you strong actionable list building techniques that simply work.
You may have found many other resources on list building. You’re working hard on trying to get it to work for you but it doesn’t. It’s not working because it’s not something that has been designed for you and your situation as a newbie blogger.
Here, I’m willing to give you my expertise to define an exact list building strategy. I will share my exact steps I followed to grow my email list from 0 to 650+ in two months.
Keep reading, and I promise you’ll get to learn crazy actionable list building techniques. You will even get the strategy to take you out from Zero.
List Building Techniques:
Before getting started, I just wanted to check out with you whether you’ve got your own web host and domain name or not yet. If you’re on a freely hosted blogging platform like WordPress.com or Blogger, then let me tell you that you that you’re not on the right track yet.
I don’t want to talk much about it here since we’re up to list building strategies that work. But if you don’t yet have a blog or if you’re on a freely hosted blog, then make sure to check my ultimate guide here on how to start a blog and why self-hosted.
If you’re already on your own web host and domain name, then you should be good to go. And this guide is the ultimate one for you to head over the next step of growing an Email list.
Let’s get our hands a little bit dirty, Nanananaaa!
List Building #1:
Create a Responsive Website:
See?
I didn’t say create an awesome extensively-developed website. All I said is that you need to create a responsive one. And by responsive here; I mean a website that is responding to different screen sizes and fit to all devices without stretching or being messed up.
You can easily create a responsive website by installing WordPress on your site and get one of the free responsive themes available out there. I’m not a big fan of investing too much money purchasing themes and plug-ins, however; you may further invest on tools and resources that will double your results and get your content a better exposure.
Give yourself like a few days to create a nice looking website then let go and move further with it. Avoid re-doing it over and over again as this way you will lose time without any results yet. Ah, and you can always come back and update the design.
Related: The Comprehensive Guide to Start a Profitable Blog
List Building #2:
Create an Optin Form on Header:
This should the first thing your visitor will come to see once they visit your website. I strongly recommend that you make something saying about a freebie you got to offer for subscribers. It’s way effective and highly converting than just saying “Subscribe to get updates“.
To get a live example of what I mean with Optin form on Header, check the header bar on my blog here where I’m promoting my eBook freebie. See the screenshot below:
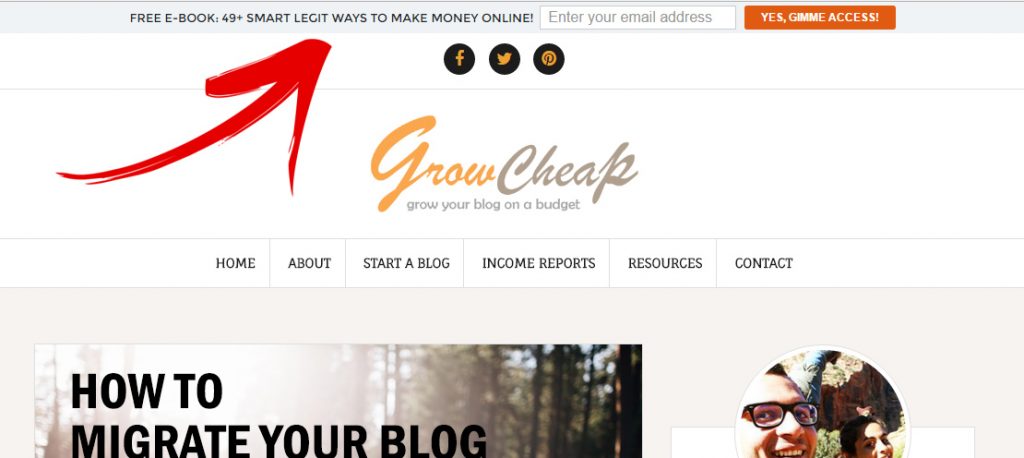
Did you get this?
Let me tell you that once I did implement this signup form on my header section, the number subscribers have been doubled than what I used to get earlier. It’s not about what you do, it’s how you do it!
I built my site as a self-hosted on WordPress.org. In order to implement this header bar opt-in form, I used to use a WordPress plug-in called SumoMe. It’s FREE!
Related: Bloom Email Optin Plugin: How to Create Inline Forms?
List Building #3:
Include 3 Additional Opt-in Forms:
The very popular mistake most newbie bloggers (like you) are committing is that they usually put one or two opt-in forms on their site. They often put it on the sidebar which is very likely to be missed by your visitors.
You’ll need to include your list building opt-in forms into around 3 to 5 additional places around your site. I would recommend that each opt-in form is having a different message.
For example, one about your eBook freebie, another about a blog post upgrades, another one to received blog updates and new posts notifications.
Here are the list building opt-in forms I included:
- Header Bar.
- Below all blog posts.
- Within many blog posts (Inline opt-in forms).
- Sidebar.
- Popup.
Since you’re just starting from zero, I recommend that you include opt-in forms in different parts with a different message for each form. One tool I use frequently is Bloom Email Opt-In Plugin, as it makes it very easy to add opt-in forms and buttons wherever you want on your site.
The point here is that once you grow your blog and get more visitors, you will be already having a website that is so ready for the maximum conversion possible.
I got to work with a blogger who is blogging for almost 5 years. Her blog gets close to 20K page-views per month, and she is still at 100+ email subscribers with no income generated out of her blog at all.
The first thing we started working on is to implement a couple more beautiful opt-in forms on different sections on her blog. And it simply worked as easy as 1, 2, 3.
She already got fans and interested loyal audience, so once we implemented more forms that cannot be missed, they just subscribed!
List Building #4:
Encourage People To Join:
A simple opt-in form saying “join my mailing list to receive updates” is poor enough to drive any potential subscriber to just head off your site. You need to encourage your readers to share their personal email addresses with you. Why may they do?
Here is where the power of the worksheets, guides, and eBooks come from. They work as incentives to encourage people to subscribe to your Email list. Such incentives give your readers an extra value in return.
Here are a few things you could offer:
- worksheets.
- Spreadsheets.
- Printables.
- 6 Days Email Course (I’m using ConvertKit to create it).
- E-Book or a Comprehensive Guide.
- Resources Library with Email Opt-in to Unlock (I’m using Bloom Plugin to do it).
These incentives above should be designed to offer for free as an extra value to your readers. And in return, they will be more than happy to subscribe to your mailing list.
See? It’s a win-win deal.
I strongly recommend that you create a free eBook or a guide that’s covering a vital topic in your niche in details. This should work as a list building evergreen freebie.
It can be integrated into any part of your website and not specifically tied to a certain blog post. It also can be used every once and while on your social media profiles.
This way you’re giving your visitors a real reason to subscribe. They visit your website and read your article, then what? What you want from them afterward.
If your message is not clear, they will simply leave your site without converting into a subscriber.
Related: 15 Quick Tips to Convert Visitors Into Email Subscribers
List Building #5:
Send Killer Email Content:
Yup! You’ve collected email addresses and turned your visitors into subscribers? It’s not wise at all to send them just junk every once and a while. You need to make sure you’re sending a killing content to them as they can simply opt out if they feel spammed!
So please don’t write a crappy email message trying to sell your audience something they don’t need. Make sure you offer a value for them, so they can simply trust you and your recommendations.
Money will come over in a way or another, but again make sure you don’t hard sell on your email marketing campaigns.
These people are your big fans. They will always be supporting you, and they will always be caring about what you write about. Make sure you treat them well. Eventually, your loyal subscribers will be the first visitors to your blog every time you publish a new blog post.
Whenever you’re hosting a webinar, offering a freebie, or publishing a new piece of content, make sure you let your subscribers know about it. Continue sharing valuable information with them.
You can spend a very long time to build a trust with your audience. But Believe me, once you build this bond with them, your mailing list is will work passively for you in return.
Doing so will certainly please your subscribers. It will even make them always want to hear back from you and to know what you think about their cases.
Related: Content Strategy Case Study: 36,282 Readers + 1,000 Email Subscribers
How to Build your Email List
And Why ConvertKit?
Now, you should have got an overall idea on how to optimize your site for the maximum conversion. It’s time to go over the technical part of the list building process. It’s time to delve deeper into how to create and integrate an email list onto your site.
There are tons of tools available out there, however; ConvertKit comes as my highest recommendation for an email list building software. It has been built specifically for bloggers helping them to create a killer Email list opt-in forms with automation rules and tons of other brilliant features.
Before heading any further, let me tell you why ConvertKit:
- Helpful Staff: This is basically the sweetest reason why I love ConvertKit. Their staff is very helpful. They always do follow back with you shall you require any further assistance. I also heard they got a private Facebook Group as another support channel besides their ticketing system, email, and phone support.
- Higher Open Rates: This is one of the most important features of ConvertKit and Why do I recommend it over tools like MailChimp. Your emails are just landing in the “Primary” tab on Gmail which means they will be seen and not missed into Promotions tab or Spam Folder instead.
- Simple Plain Emails Save Time: Yes! Unlike other apps, you’ll not have to fill in a template every time you send an email. ConvertKit is basic and very plain which means you will spend less time writing an email and getting it delivered. Literally, You will type your email, then hit send.
- More Advanced Analytics: On ConvertKit, you’re doing email marketing like a pro. You will get more advanced analytics graphs and details about your subscribers and where each of them is coming from. You can also see what other tags or forms each of your subscribers are on and how active they’re in opening your emails.
- Tag your Subscribers: Assigning tags to your subscribers is one of the most important features ConvertKit got to offer. It will simply scale up your email marketing strategies to the next level. The power of tags is seriously endless as it will let you build different segments of subscribers and target each of them upon their interests and tags.
- Build Landing Pages: With other email marketing products, you may spend like $30+ per month to build and customize landing pages. What I love about ConvertKit is that it allows you to build landing pages without paying a dime as it’s included in your package.
- Subscribers History: Wow! This is another great feature about ConvertKit. You can simply ‘Spy’ on your subscriber’s history. What emails they’ve open, and what are their interests since they joined your email list.
And tons and tons of other amusing features which you don’t want to miss if you’re serious about list building and growing it from zero.
How much does ConvertKit Cost?
If you’ve got less than 1,000 subscribers into your mailing list, ConvertKit will only cost you $29/month. I would say you want to invest in getting ConvertKit only if you’re serious about your business and got big dreams on massive list building.
If you’re a newbie blogger just getting started, ConvertKit will robust your enthusiasm about email marketing. It will scale up your blogging career opportunities right from day one.
Are you an Expert with many years into blogging?
Then, Make sure to integrate ConvertKit’s features into your blog to maximize your conversion and ROI.
If you’re interested in switching over to ConvertKit, make sure you use our referral link here. We love ConvertKit so much and we became affiliates for their awesome product. When you buy through our link, you’re funding our blogging addiction and supporting our blog.
I’m in,
How To Get Started:
First, you will need to head over to ConvertKit website here. You will land on their home page shows the following:

Click get started. And you will be referred to their pricing page to choose your package. ConvertKit pricing is based on the number of your Email list subscribers.
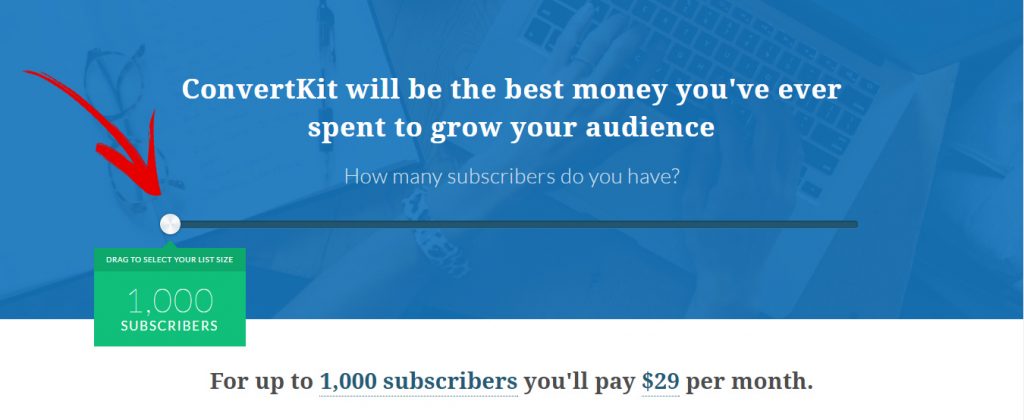
So if you’re having 0 or less than 1,000 subscribers, you’ll only pay $29/mo. All their plans include unlimited forms, Courses, Landing Pages, Automation Rules, Email, etc. Drag to select your list size, and then click “create your account“.
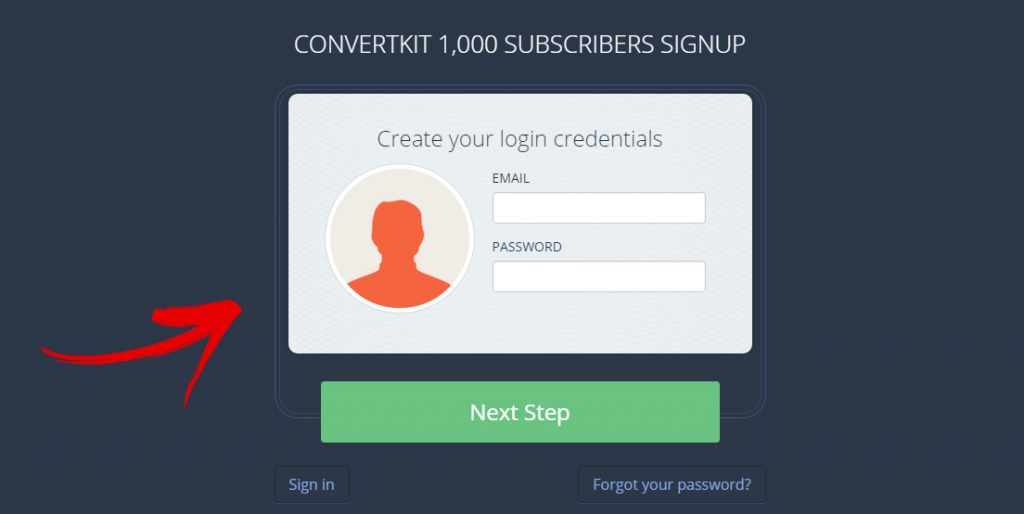
It will take you then to a page where you’re intended to create your login credentials. Enter your Email Address and Password, and then hit Next Step.
Pretty Straight forward, it will then ask you to put your billing information. After you finish, hit “Create Your Account”.
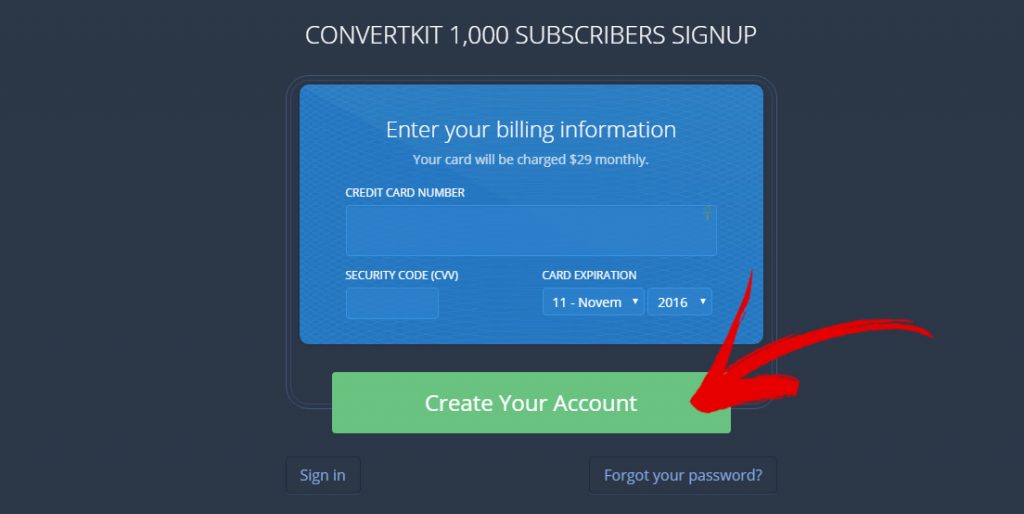
Now you should be good to go. You will receive an email from ConvertKit with your username and password. Use these login credentials to access your ConvertKit dashboard and start building your Email Marketing Strategy.
I’ve Purchased ConvertKit, Now What?
The first thing to do now is to play around the ConvertKit dashboard to get to understand what it’s all about. You will need first to spend some time on it to discover the available tools and what the heck does each one does specifically.
I understand that it looks overwhelming a little bit, but believe me; ConvertKit is one of the most easy-to-understand email marketing apps on the planet. It won’t be more than a few hours and you will get to discover every little corner and how to use it.
Now, you will need to create your very first Opt-in form and integrate it on your site. In order to get started, you will need to follow the following steps:
- Login to your ConvertKit account and click “Create Form” button.

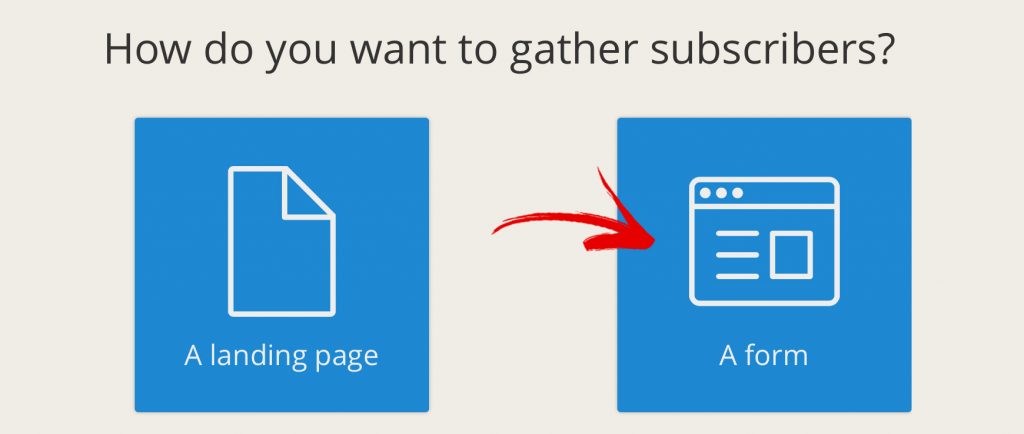
- It will ask you whether you want to build a landing page or an opt-in form.
In our case here, we will choose “A form“.
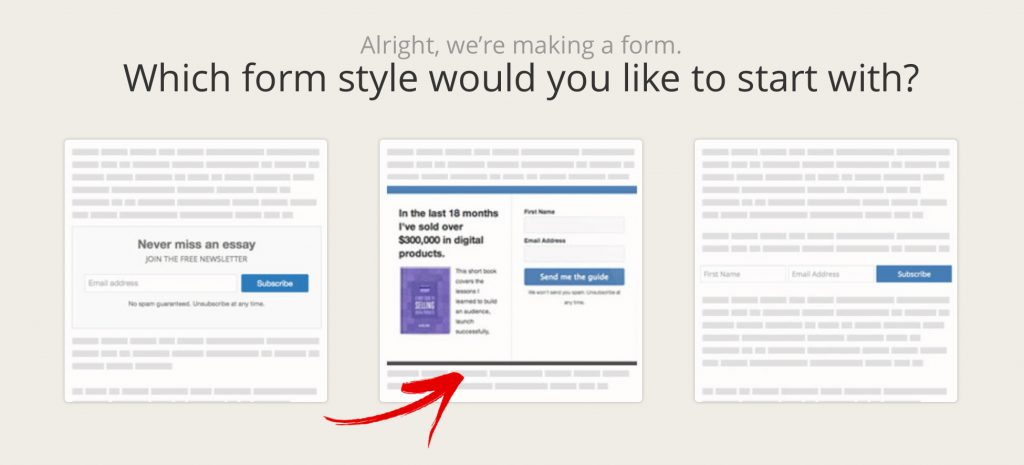
- You’ve got three design options here. I would say it’s better to go with the middle one as it will allow you to put a picture of your incentive ( eg: ebook, worksheet, or printable download ) and to mention more details about it.
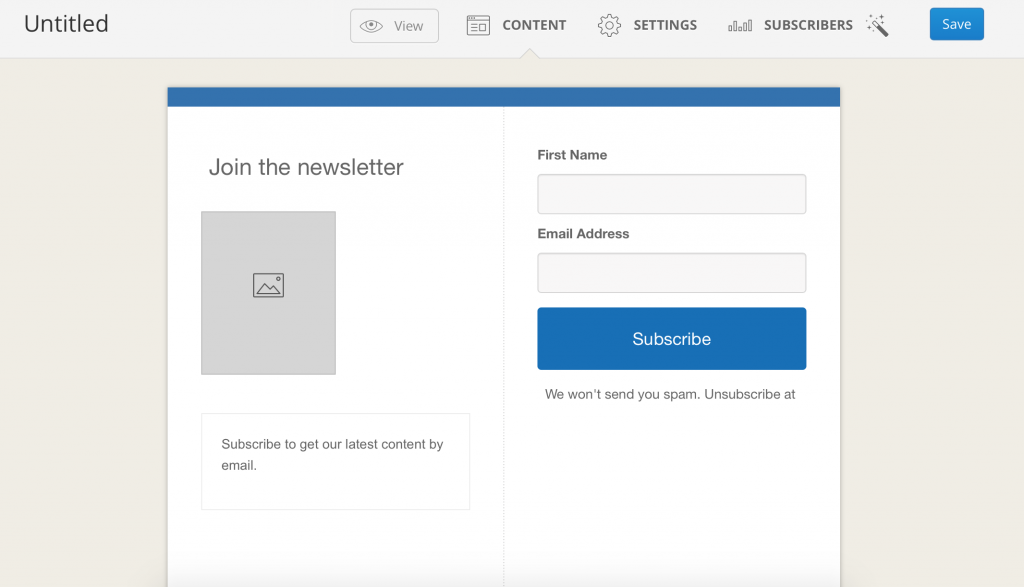
- Once you’re done with choosing the style, then it’s time to further customize it to fit your blog design and colors. You can also change the word “Subscribe” to anything else you prefer.
- I would say you may go with “Yes! Give me access“. One little tip here is to make sure you click “Save” on switching between tabs.
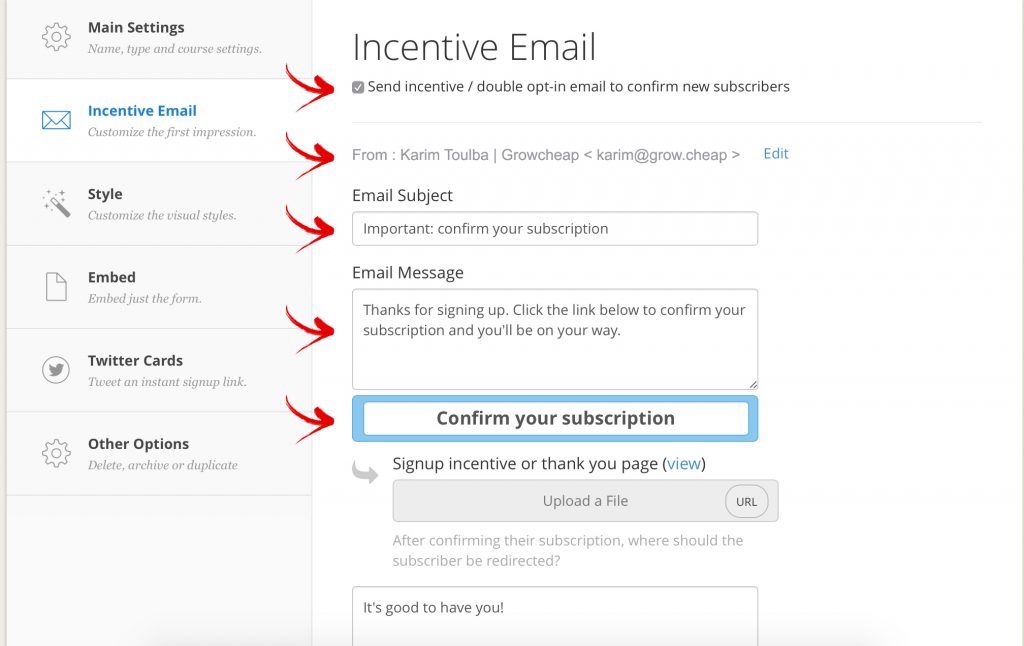
- Now after you’re done with customizing your opt-in form, Click “Settings” Tab on the top and go to “Incentive Email” option on the left sidebar. Make sure you update the following optins to fit your blog.
- After you edit and customize the above fields, it’s time to embed it onto your site. First save the changes, then head to “Embed” on the left sidebar, copy the code shown, then paste it on your site as a widget. You can then add it to a text widget to place anywhere on your sidebar.
- Congratulations!
You’re all set now and ready to grow your Email list.
Conclusion:
It was such a darn long post counting 3,000+ words. I made sure to walk you through on the strongest list building techniques, how to optimize your site for the maximum conversion, and how to attract subscribers and give them reasons to opt-in.
Not only that, but I also went over to the technical part of the story and showed you how to create your first opt-in form using ConvertKit, and how to integrate it on your site.
My point behind this comprehensive guide is to give you clear insights about what email marketing is all about, and how to get started with building a strategy for growing your audience.
And If I’m to advise you, It’s recommended that you give a priority to list building right from day one. Without an Email list, you’re missing out huge opportunities every single day. And nevertheless, you will regret not doing so earlier.
Let me know in comments shall you’ve got any questions or concerns, & I will be so happy to assist you further. I would love to cheer you up and help you getting it configured the optimal way.


Jatin,
Thanks a lot for the awesome comment.
I’m glad it turned to be useful for you and your blog.
I totally agree that CK is worth every cent.
All the best,
Karim
Hello Karim,
Exactly Convertkit best is an awesome tool to build E-mail list and currently I am using Mailchimp and also you have described full tutorial very well. in short time I will purchase Convertkit follow your strategy to build my E-mail list as well as Income Like you!!!
Keep It Up Karim
Best Of Luck
Converkit is an awesome tool and alnost every other top blogger is using it because of its super features.
I am currently using MailerLite, but soon migrate to ConvertKit.
Thanks fornthe information
Shafi,
I’m so glad to see your comment here.
I totally agree with you. ConvertKit is an awesome tool with super awesome features for bloggers and online marketers. I’ve purchased ConvertKit a while back, but didn’t yet put it into operation for this blog. I think I will do so by January or so with my planned marketing strategy for it by then.
Thanks again
And all the best for you and your blog.
You’re doing an awesome job.
Thanks for the info!
Sure.
Glad it turned to be useful for you.
Thanks,
Karim
Thank you Karim for such comprehensive article. We definitely will try this approach to grow our e-mail list – good tips there. I am also about to write a freebie. I know that worked for myself many-many times. When I see someone is offering something valuable I want to subscribe. Also, recently I noticed when I wanted to subscribe to someone’s e-mail list, I couldn’t easily find subscription field. Couple times I had to leave a website without subscribing…
I also want to share another way to start growing your e-mail list. Last week I participated in Patt Flynn’s challenge “Grow e-mail list from 0 to 100 in 72 hours”. The recipe was to first make a list of 10 people who might be interested in your topic and ask them if they want to know more about it. If they say YES, ask for an e-mail. Next day you would have to contact as many people as possible. And then send them thank you e-mail asking what are they struggles within the topic, so you know what info to provide them.
The most intimidating was to send the message to those 10 first people on the list. Then you realize that the worst that could happen they either ignore you or say NO.
So I was able to get 35 subscribers during 72 hours. Now I have total 36 subscribers (including you :))
thank you very much again!
Nadia
Nadia,
I believe this is an awesome progress for you. 36 subscribers is a pretty good number, however; you still can do even more and more than that in less time. I liked the idea of Pat Flynn’s challenge and I see a huge potential in it.
I’m using such strategies as well, and I think I hope to report 300+ subscribers on my upcoming income report (yet, fourth-month blogging). It all depends on what you do to catch people’s attention about what you do. Go here and there and reach out and tell the world about your site and what you’re doing, and believe it will work way better than you may think.
I’m glad you liked the article. And yup it’s so disappointing when you can’t see where to subscribe in a site! That’s why I believe in the quote “People need to see the same thing 5-7 times before making a decision”.
Good Luck,
And all the best for you and your blog.
Karim